
Affiliate Disclosure: Some links in this article may earn us a small commission if you make a purchase, at no additional cost to you.
The Truth About NVIDIA App & Control Panel Tweaks: Do They Work?
We wanted to dive in quickly and uncover the truth behind these NVIDIA Control Panel and App tweaks. Do they work? Sure. They do work, but not by drastically increasing your framerates. Instead, they customize your gaming experience with tools like G-SYNC, DLSS Override, and Forcing Anisotropic Filtering or Anti-Aliasing to replace older or games that miss these nice to have features all together.
While there are certain tweaks that actively lower latency and boost your frame rates, we are going to focus strictly on the absolute best settings. We won't flood you with over 100 useless tweaks that do absolutely nothing for your performance in modern gaming.
You'll Need A NVIDIA GPU for these tweaks, you can find the best graphics card for you on our best GPU buying guide.
NVIDIA Tweaks for Low Latency and High Refresh Rates
Restore NVIDIA Default Settings
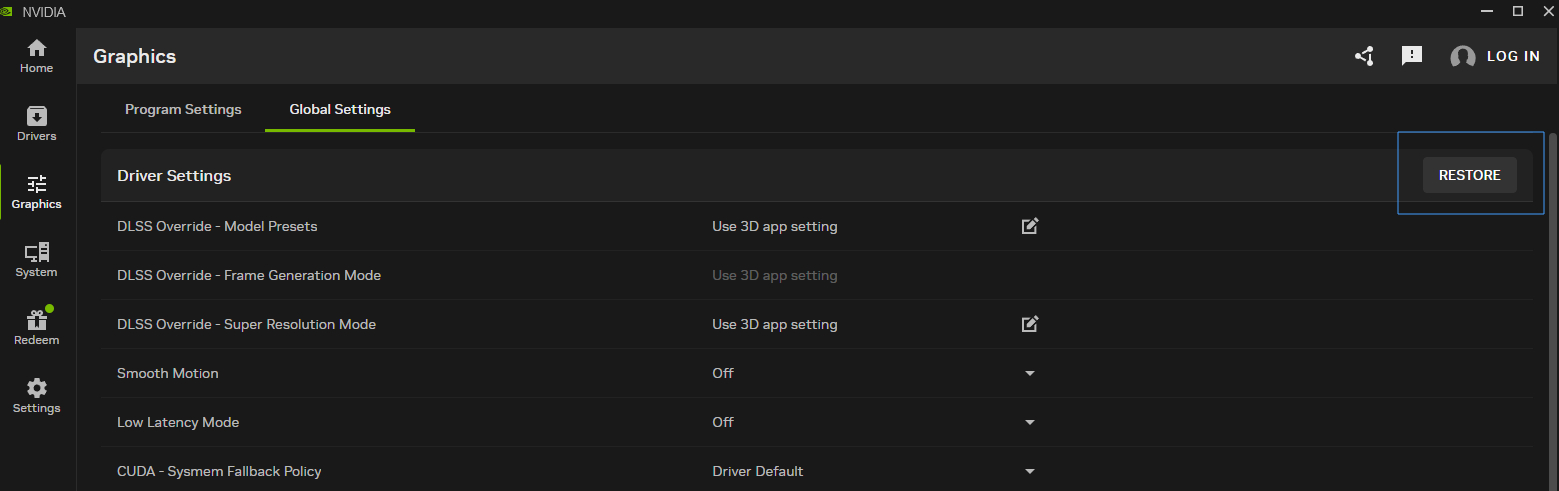
To start off, just restore the defaults in your global and program settings. Over tweaking often backfires, leading to settings that mess up your in-game visuals or do practically nothing for real world performance. You might not believe it, but out of the box NVIDIA default settings with modern drivers come pre-tuned for near-perfect performance when paired with modern hardware. Restoring the defaults easily gets you 90% of the way there for driver optimization.
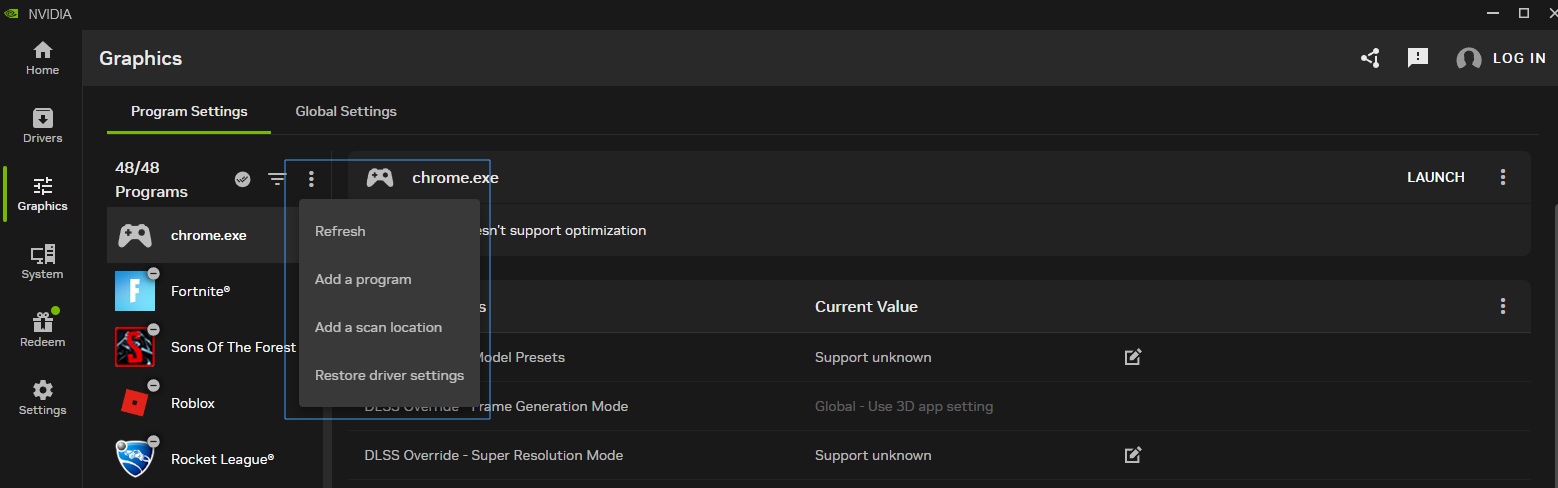
Go to the Graphics tab, then select Global Settings and click Restore on the right side of the screen. Alternatively, you can go to Program Settings, click the three dots next to a specific game, and click Restore Driver Settings. (For NVIDIA Control Panel, the same settings can be found under Manage 3D Settings.)
Should You Use Low Latency Mode?
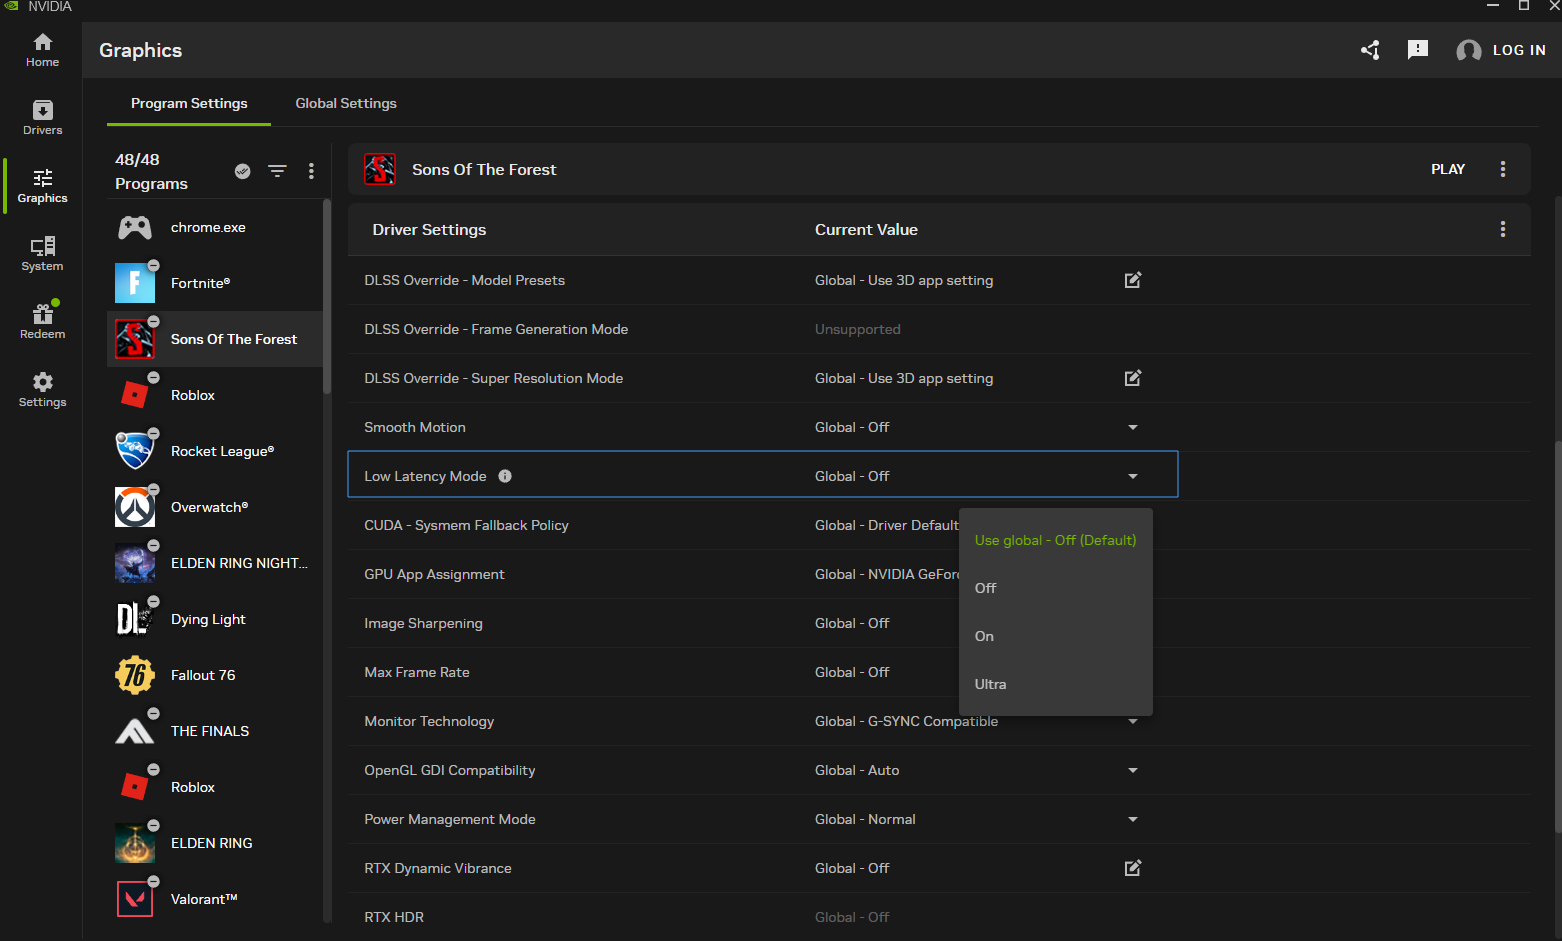
Most likely not. Most games where you actually need Low Latency Mode already natively support NVIDIA Reflex, which bypasses the driver queue entirely to drop latency dramatically and is easily accessible directly within your in-game settings. Reflex is by far the superior option for modern gaming.
You should only consider turning Low Latency Mode to On or Ultra for older games that don't support NVIDIA Reflex, or games where you plan on enabling Frame Generation without Reflex available. If you do change this setting, make sure to do it strictly under Program Settings so it isn't forced on globally for all games.
For a much more in-depth breakdown of how these two technologies interact, check out our dedicated guide on Nvidia Low Latency Mode vs. Reflex.
How To Optimize G-SYNC For Smooth Gameplay and No Input Lag
Enable G-SYNC in the NVIDIA App
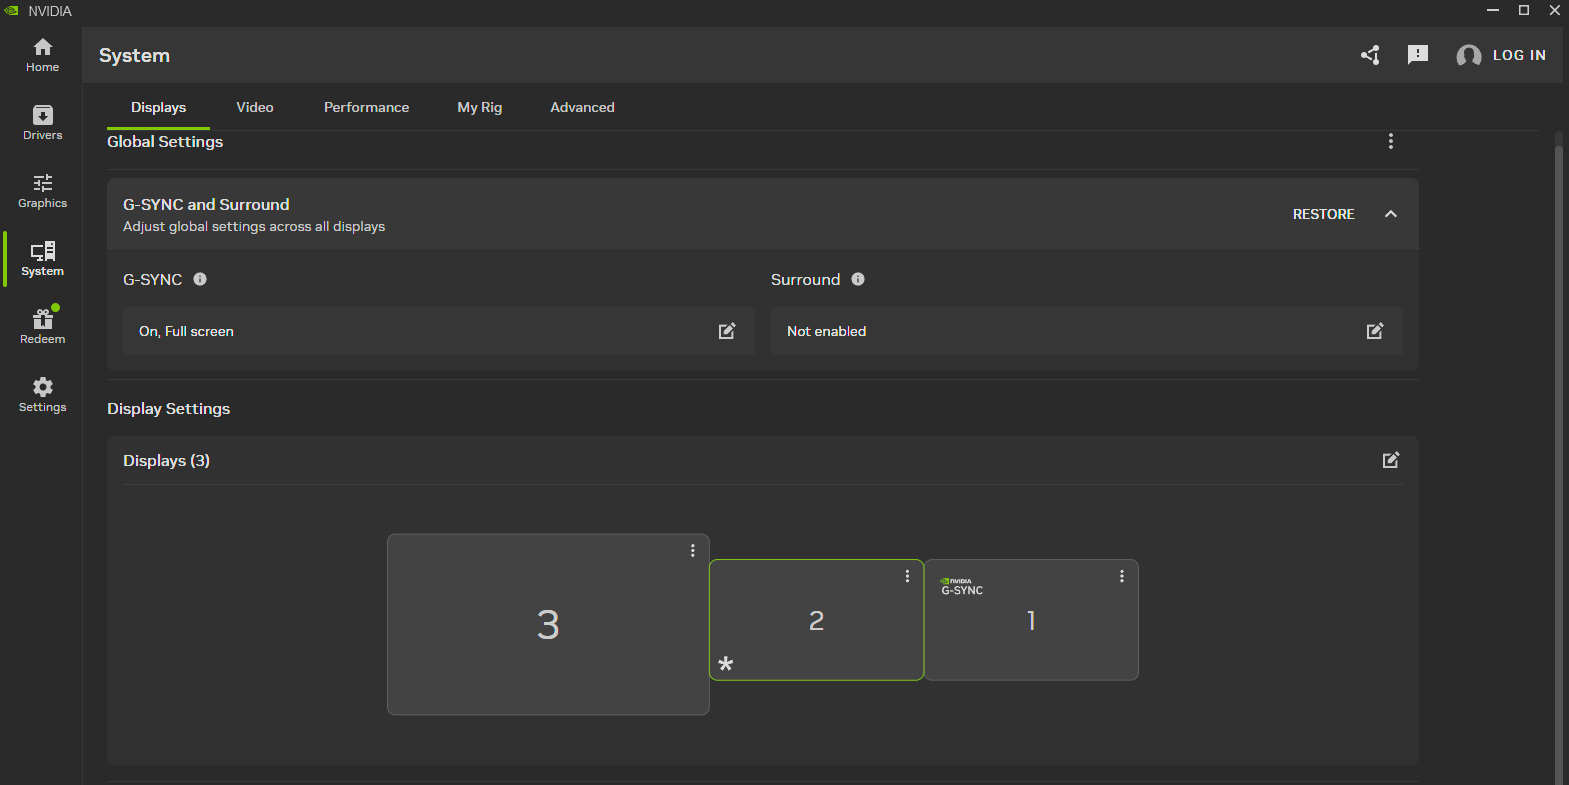
Navigate to the System tab, select Displays, and click the dropdown menu for G-SYNC and Surround. Next, click on the specific monitor you want to configure; it will highlight with a green border to show it is selected. From there, simply change the G-SYNC menu setting from "Off" to "On, Full screen."
The Best G-SYNC Settings For No Tearing and Low Latency
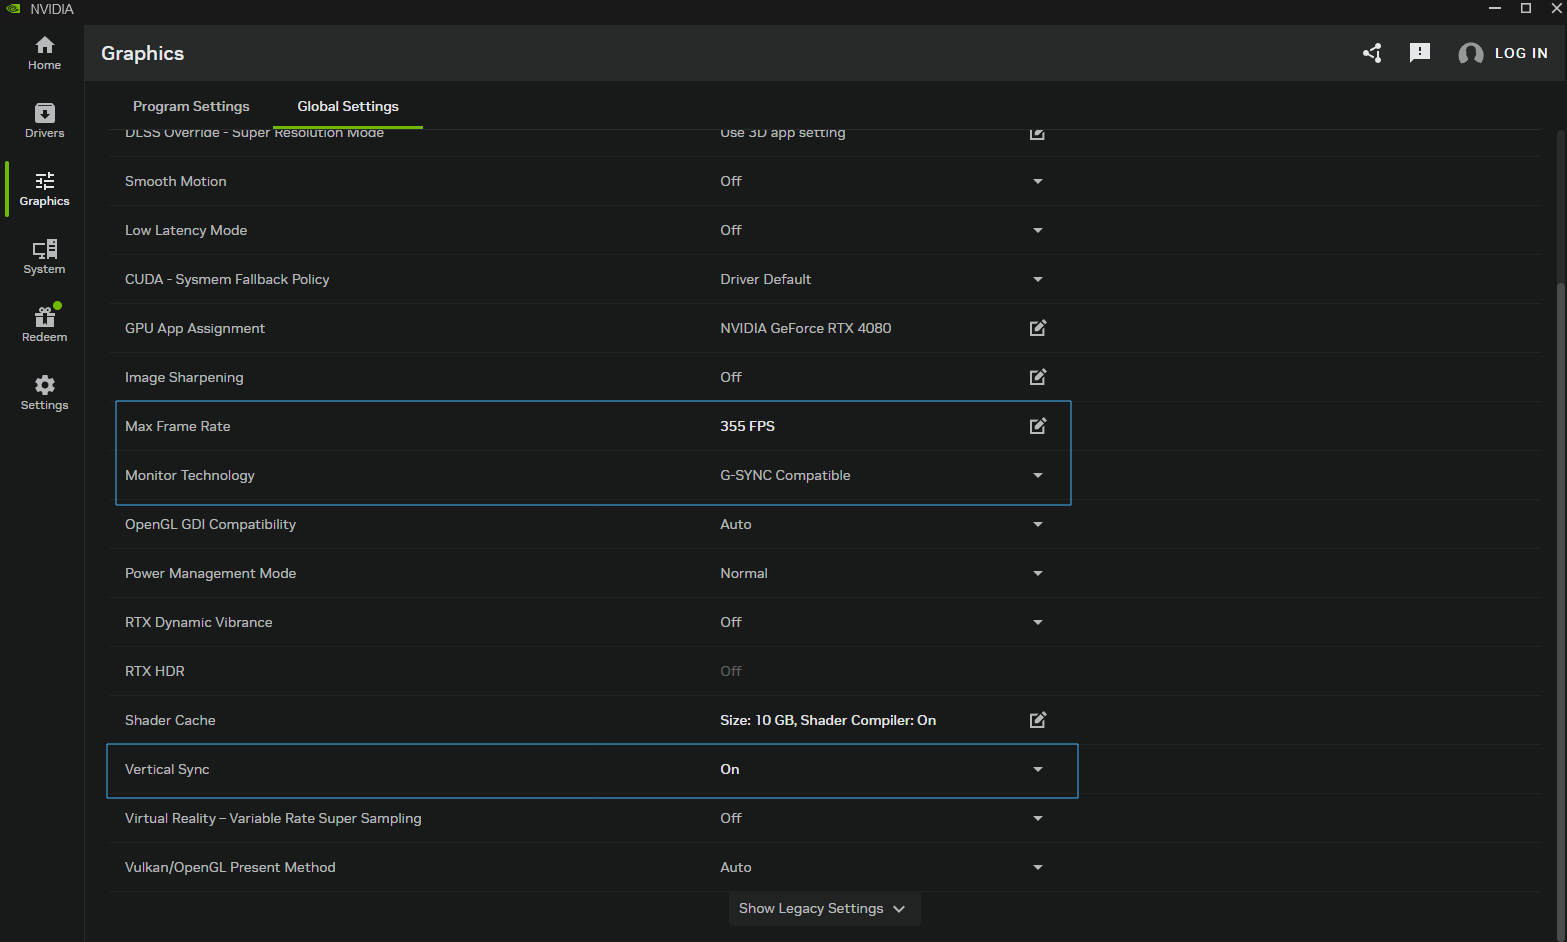
In the NVIDIA App, navigate to the Graphics tab and click Global Settings. To achieve the lowest possible latency, you are going to want to cap your frame rate 3 to 5 FPS lower than your monitor's maximum refresh rate. Because we are also going to enable V-Sync, we don't want the game to actually hit our maximum refresh rate, doing so will trigger standard V-Sync behavior and increase latency by a lot.
A safe bet is that for anything 360Hz or higher, you should cap your frame rate 5 FPS under your refresh rate. For 240Hz or lower, just drop it 3 frames lower. On 360Hz or higher monitors, it requires a larger frame buffer to account for frame overshoot. Make sure all of these settings are applied globally within the NVIDIA App or Control Panel.
Power Management Mode: Normal vs. Max Performance
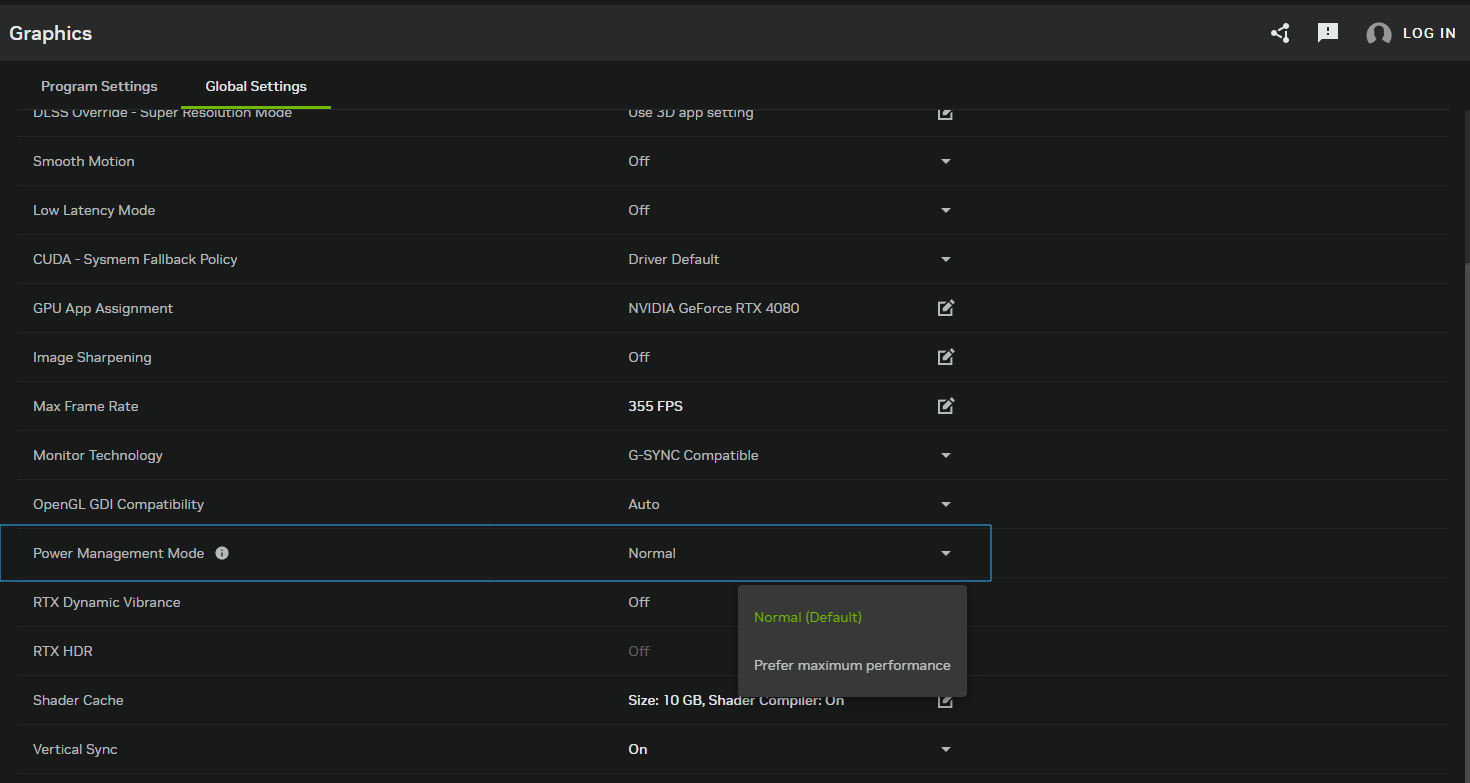
The best option here is usually just leaving the setting on Normal. Selecting Prefer Maximum Performance forces your GPU to run at its maximum core frequency at all times when a game is running, which increases heat a lot.
Is there a performance difference? Yes, but in most cases, enabling Prefer Maximum Performance only helps in older games or heavily CPU-intensive games by possibly helping to stop micro-stutters. Even then, it is not a given to really help at all, it's just a small chance depending on the games you play or a very small FPS increase overall. Modern NVIDIA hardware and drivers are smart enough these days that the Normal power setting is already optimal for maintaining excellent gaming performance without the extra heat.
Normal (Optimal): Dynamically scales your GPU clock speeds and voltages based on your active workload, rather than pushing maximum frequencies at all times. This keeps your system running cooler and significantly lowers power draw.
Prefer Maximum Performance: Forces the GPU clock speeds to stay locked at maximum frequencies regardless of the actual workload. While this can occasionally help resolve micro-stutters on older hardware or in legacy titles, the card will never downclock, resulting in massive extra heat and constant, unnecessary power draw.
Best Settings For Cache Size and Automatic Shader Compilation
How To Get Automatic Shader Compilation
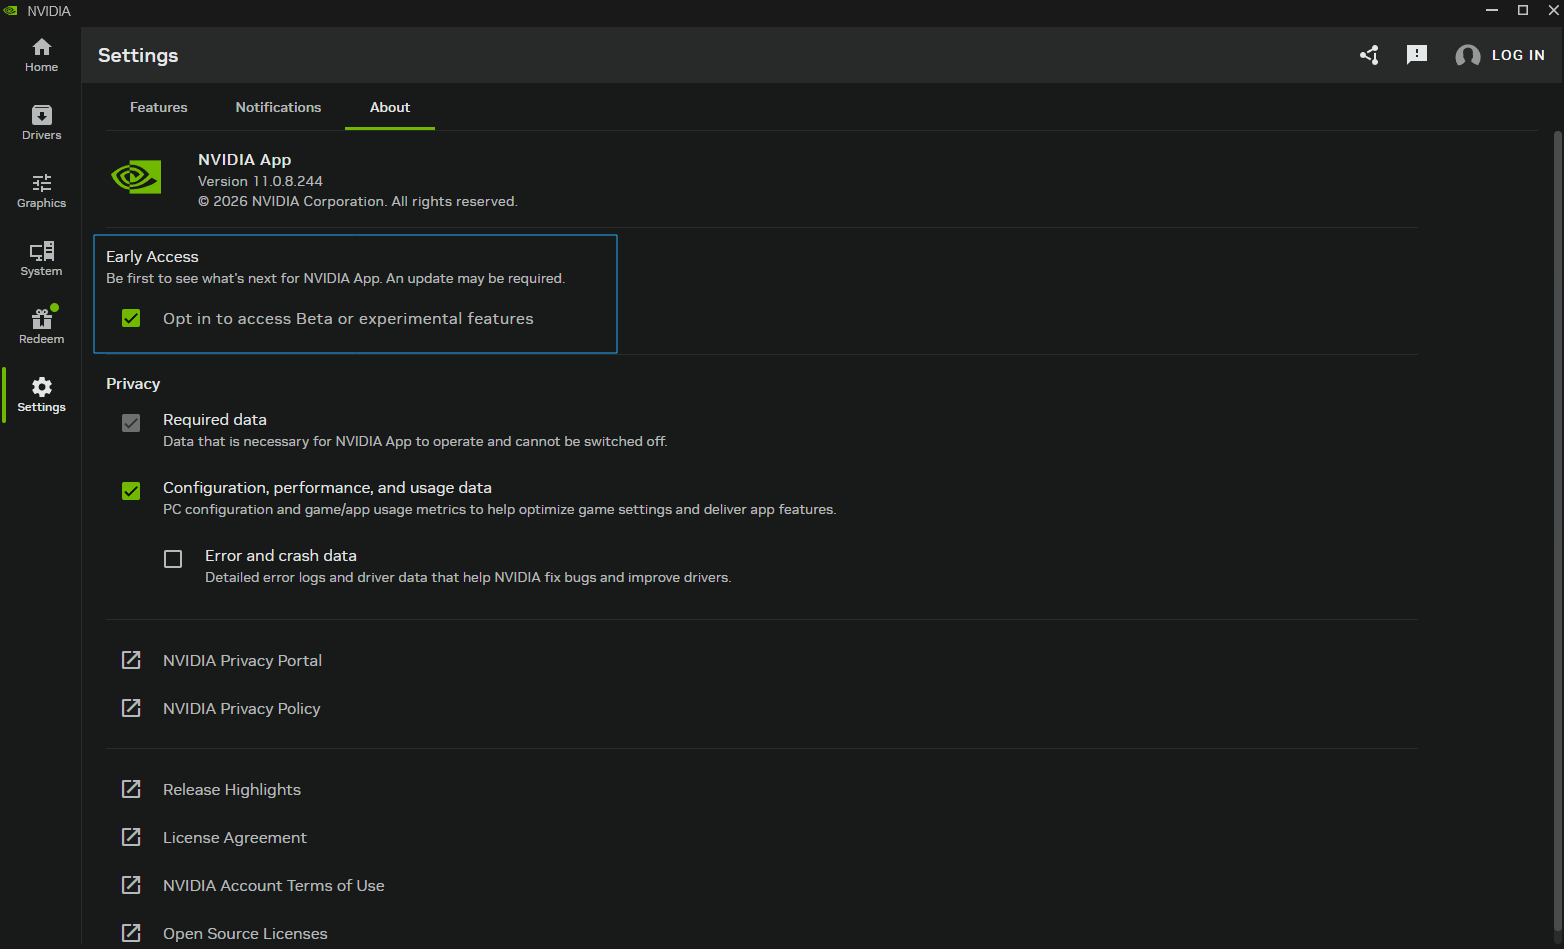
In the Nvidia App you need to navigate to Settings tab and then click About at the top, there you should a button to opt in for accessing Beta and Experimental Features. Click the check box and update your NVIDIA App.
How To Enable Automatic Shader Compilation and Set Cache Size
Navigate to the Graphics tab in the NVIDIA App, and under Global Settings, look for the Shader Cache Size option to adjust your limit.
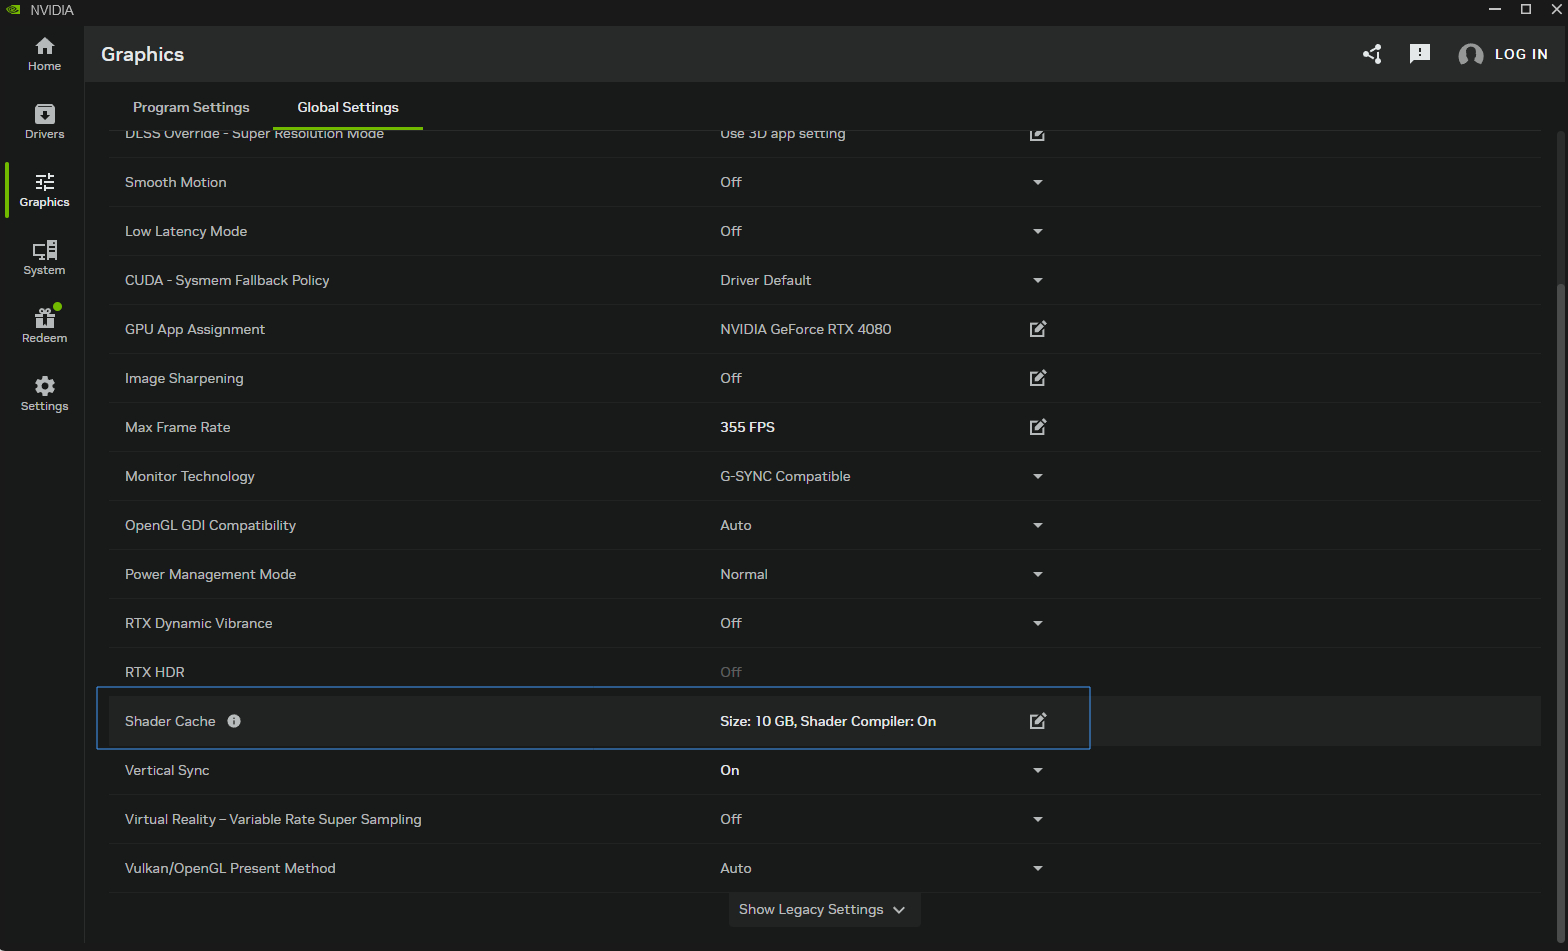
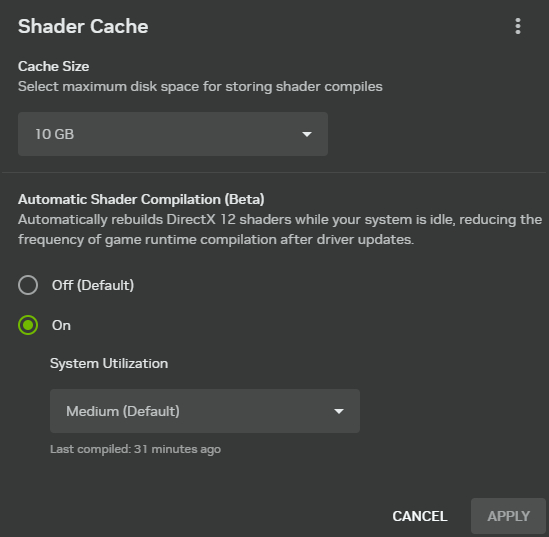
Then, select a Shader Cache Size of 10 GB or higher and toggle on Automatic Shader Compilation. Your System Utilization should be left on Medium for a good balance of background performance. Setting it to High might be too much for your CPU, eating up too many available resources while you use your computer.
What DLSS Override Model Presets Should You Use?
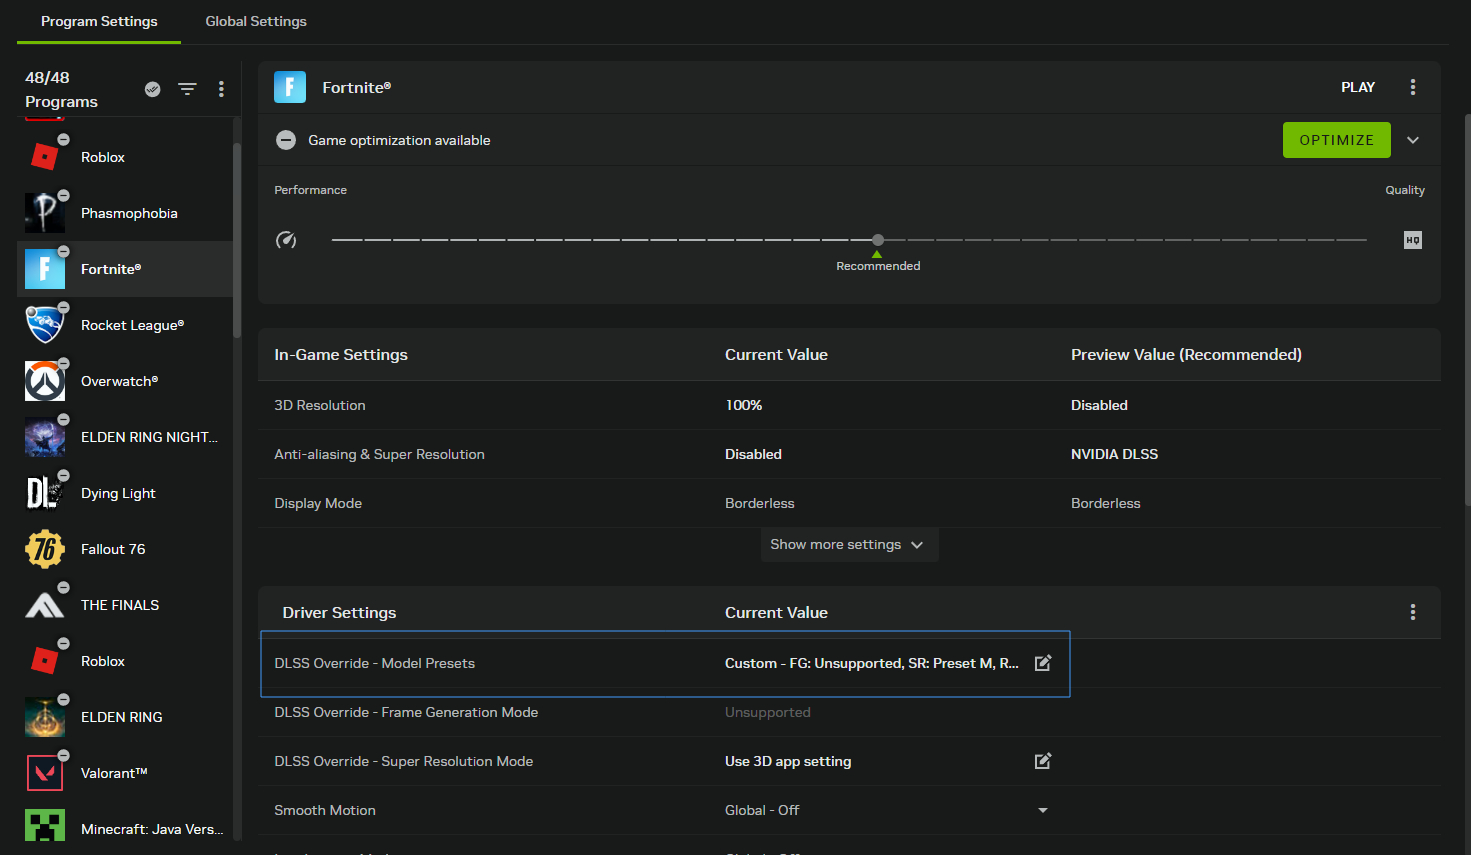
You will find DLSS Override in the graphics tab, then either choosing Global or Program settings tab at the top. Then you edit the DLSS Override Model Preset. We recommend doing for specific programs, because there is actually a few different scenarios where you choose between the models. The type of game and graphics settings you use tend to matter here, not to mention hardware performance.
Picking The Right DLSS Override Model For You Game
Simply just select the Super Resolution drop down menu and choose a Preset, feel free to try the. all out but we will recommend what we believe to the best presets below. You can also choose newer frame generation model presets if they are supported with that game and your GPU.
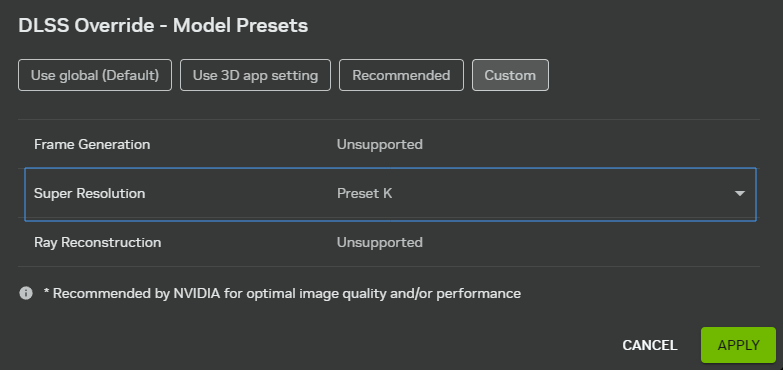
Preset K: The best all-rounder for any NVIDIA graphics card. It delivers great results without causing visual bugs while keeping the image looking crisp. It provides a phenomenal balance of amazing image quality and performance. We highly recommend this if Preset M or L breaks your game's visuals or causes a sudden drop in performance. (Example: For us, enemy outlines in Overwatch had a distracting shimmering/glowing effect, and switching to Preset K completely fixed the issue.)
Preset L: Created with extreme 4K resolution upscaling in mind, specifically when upscaling from much lower base resolutions like 720p. This model does a fantastic job of improving smaller details, such as foliage, while cleaning up edges and preventing over-sharpening to provide a much more natural look.
Preset M: Designed explicitly for DLSS Performance mode. It sharpens the image and upscales it dynamically so the game doesn’t look blurry like previous iterations of performance modes did. This is generally excellent for competitive games where you want to maximize performance, though in a few games, we noticed it can look a bit soft or completely break certain visuals (as noted in our Preset K example above).